Unlocking Android developer settings is an essential step for anyone interested in app development, debugging, or custom modifications to their device. This guide provides practical insights and evidence-based steps to enable developer options on an Android device seamlessly.
Key Insights
- Primary insight with practical relevance: Understanding how to enable developer settings can lead to improved app debugging and custom functionalities.
- Technical consideration with clear application: Enabling USB debugging enhances the ability to test apps on your device.
- Actionable recommendation: Follow a straightforward, step-by-step process to unlock developer settings.
Understanding Developer Settings
Developer settings provide advanced options that are typically hidden by default to prevent accidental changes that could affect device performance. This area of the Android settings menu is specifically aimed at developers and power users. To get the most out of your Android device, it’s important to understand these settings. Enabling developer options opens up a plethora of useful features, such as USB debugging, mock location settings, and more, that are vital for app development and testing.Steps to Enable Developer Settings
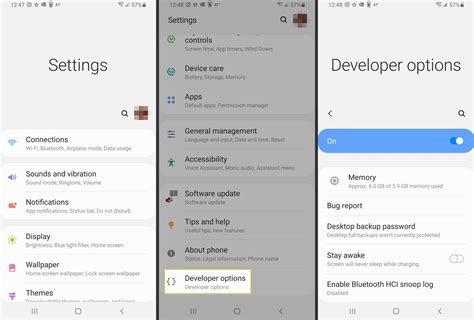
Unlocking the developer settings is a simple process that involves accessing the settings menu and enabling a hidden feature. Here’s a detailed guide to help you through it:Start by navigating to the Settings app on your Android device.
Within the Settings menu, find and tap on About phone or About device. This section typically contains information about your device’s software version and build number.
Next, look for the Build number entry and tap on it seven times. You might see a message indicating that you are X steps away from being a developer. Keep tapping until you see a notification that says You are now a developer!
Upon completion, return to the main settings menu. Here, you will now see a new option labeled Developer options. Tap on it to access the advanced settings.
In the developer settings menu, you will find various options, including USB debugging, which is a crucial feature for developers to test applications directly on the device.
Why Enable Developer Options?
Enabling developer settings on your Android device offers numerous benefits for both casual users and professionals. Here are some compelling reasons:- USB Debugging: This is perhaps the most widely used feature in developer settings. USB debugging allows apps to communicate with the device for development purposes, making it essential for developers to test their apps on a real device.
- Mock Locations: This feature allows you to set a mock location for testing apps that use GPS services. This is particularly useful for developers to see how their apps perform under various geographical settings.
- Animation Scale: This setting enables you to adjust the animation scale, which can help reduce battery consumption if you prefer faster interactions. Conversely, developers can extend the scale for thorough testing of UI transitions.
Will enabling developer options affect my device's warranty?
No, enabling developer options does not void your warranty. It’s a configuration setting and does not involve any hardware modifications.
Is it safe to use the developer options?
Yes, it’s safe to use developer options as long as you are cautious and do not change settings that you do not understand. Many of these settings are for advanced users and developers, and when used appropriately, they offer significant benefits.
By following these steps and understanding the benefits, you can unlock the full potential of your Android device, providing a robust environment for development and advanced customization. This guide ensures that you can enable developer settings effortlessly, paving the way for enhanced app testing and device optimization.