Choosing the best hair color developer is crucial for achieving vivid, vibrant results that enhance the hue of your hair dye. Whether you’re aiming for a bold new look or just brightening your existing color, understanding the role of a developer is essential. This guide will walk you through everything you need to know to select the right developer and maximize the longevity of your vibrant hair color.
Problem-Solution Opening Addressing User Needs
Are you frustrated with your hair dye not coming out as vibrant as you wanted it to? Do you find yourself repeatedly using more and more dye to maintain the color? The secret to achieving that dazzling, vibrant color that lasts lies in using the right hair color developer. A developer is the unsung hero behind any successful hair dye job. It works in harmony with the dye to open the hair cuticle, allowing the color to penetrate deeply and produce the stunning shades you desire. However, not all developers are created equal. Choosing the wrong one can lead to muted results, patchy coloring, or even damage to your hair. This guide will walk you through every step, ensuring that you select the best developer for your needs and get those vivid, long-lasting results without compromising on your hair’s health.
Quick Reference
Quick Reference
- Immediate action item: Always patch test your dye and developer to check for any allergic reactions.
- Essential tip: Match the developer’s percentage to the strength of your hair dye for optimal results.
- Common mistake to avoid: Over-mixing the dye and developer can lead to uneven coloring and may weaken hair.
Understanding Hair Color Developers
Developers, also known as oxidizers, are the key components that enable color to penetrate your hair. They contain peroxide that acts as a catalyst, breaking down the cuticles and allowing the dye to enter. There are several types of developers, each with different strengths. Here, we’ll break down the main types of developers and how to use them for the best results.
Types of Hair Color Developers
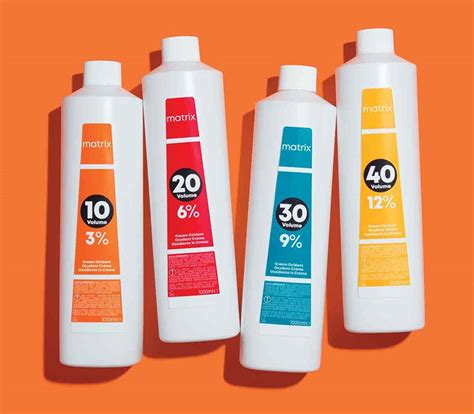
Developers are available in different percentages, with higher percentages indicating a stronger developer. Here’s a closer look at the most common types:
- 3% Developer: Best for subtle color changes and maintaining the natural hair color. It’s great for toners and low-lift permanent dyes.
- 6% Developer: Suitable for light to medium hair colors and medium-level lifts. Ideal for semi-permanent dyes and gradual color changes.
- 9% Developer: Used for light-medium hair colors with minimal damage. It works well for brightening hair with toners and some permanent dyes.
- 12% Developer: Perfect for medium to dark hair colors, medium to high lifts, and permanent dyes.
- 15% Developer: Ideal for high-lift permanent dyes and when you need to cover gray hair or achieve very dark shades.
- 20% Developer: Used for the most significant color changes and high lifts, often for achieving black or very dark shades.
How to Choose the Right Developer
Selecting the right developer for your specific hair color and desired outcome involves understanding your hair’s condition, the dye you’re using, and your personal goals. Here’s a step-by-step guide:
Step 1: Assess Your Hair Condition
Before you choose a developer, check the condition of your hair. Healthy hair can usually handle a higher percentage developer, while damaged or fine hair might need a lower one. Consider factors like:
- Current hair color
- Hair thickness and texture
- Overall health and damage level
Step 2: Identify the Color Change You Want
Determine how drastic the color change should be. If you’re just brightening your existing color, a lower percentage developer might suffice. However, for a dramatic new color or significant lightening, opt for a higher percentage.
Step 3: Match Developer Percentage to Dye Strength
Developers are available in a range of percentages, from 3% to 20%. Dyes also have strength levels that dictate how they interact with the developer. It’s crucial to match the developer percentage to the strength of your hair dye for optimal results. Here’s a simplified guide:
| Dye Strength | Recommended Developer |
|---|---|
| Low (e.g., semi-permanent dyes) | 3% - 9% |
| Medium (e.g., most permanent dyes) | 6% - 12% |
| High (e.g., high-lift permanent dyes) | 12% - 20% |
Step 4: Consider the Brand Compatibility
Developers from different brands might have slightly different properties. It’s best to use a developer from the same brand as your dye for consistent results.
Step 5: Listen to Your Hair’s Needs
Once you’ve chosen a developer, listen to your hair during the process. If it starts to feel overly dry or damaged, you may need to adjust your technique or opt for a moisturizing product post-color to restore health.
How to Apply Hair Color Developer: A Step-by-Step Guide
Applying a developer correctly is critical for achieving the vivid results you desire without compromising the health of your hair. Follow these detailed steps for the best outcome.
Step 1: Preparation
Before you begin, gather all necessary tools and products:
- Developer
- Hair dye
- Mixing bowl
- Mixing stick
- Gloves
- Sectioning clips
- Caps or plastic wrap
- Brush
Step 2: Mix the Developer and Dye
To ensure an even color and prevent streaks, it’s essential to mix the developer and dye thoroughly:
- Fill a mixing bowl with the required amount of developer.
- Measure out the correct amount of hair dye as per the instructions on the dye package.
- Gently stir the dye into the developer using a mixing stick until a uniform, paste-like consistency is achieved.
Step 3: Section Your Hair
Divide your hair into manageable sections to ensure even application:
- Start by sectioning your hair into four main sections: front, back left, back right.
- Further divide each section into smaller subsections, depending on the thickness of your hair.
Step 4: Apply the Mixture
Even application is key for a flawless finish:
- Put on your gloves to protect your hands.
- Starting with one section, lift it and apply the mixture using a brush. Work from the roots to the tips, ensuring complete coverage.
- Repeat this process with each section, applying the mixture thoroughly and evenly.
Step 5: Wrap Your Hair
To maximize the color absorption and protect it from external factors:
- Once all sections are colored, wrap your hair in caps or cover it with plastic wrap.
- Leave the mixture on for the recommended time specified on the dye instructions.
Step 6: Rinse and Condition
After the processing time, it’s time to cleanse and rejuvenate your hair:
- Rinse your hair thoroughly with lukewarm water until the shampoo is completely removed.
- Apply a color-safe conditioner to lock in moisture and enhance shine.
- Once you’ve finished rinsing, towel dry gently and avoid brushing your hair until it’s completely dry.